Easy No-Bake Cheesecake Pops for Sweet Fans
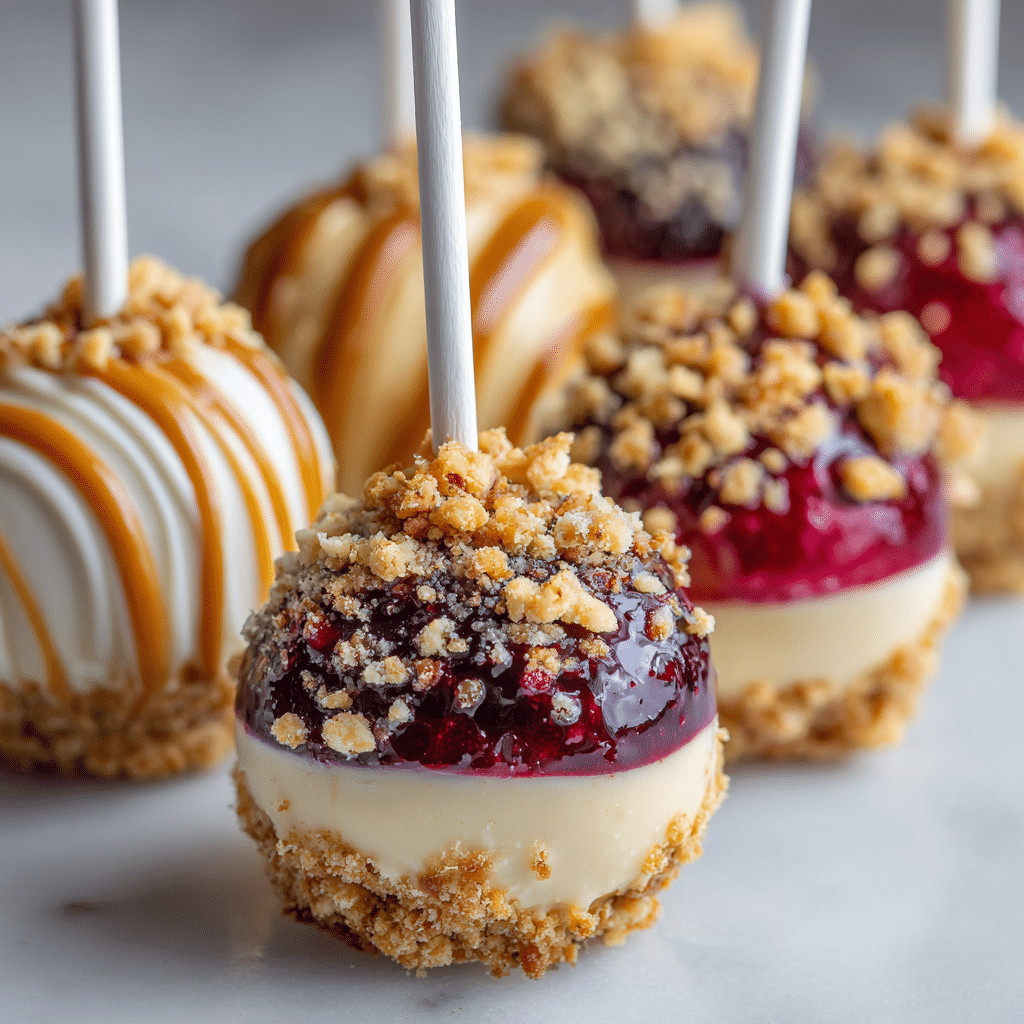
If you’re craving a delightful treat that comes together effortlessly, these No-Bake Cheesecake Pops are exactly what you need. Picture creamy, tangy cheesecake filling rolled into bite-sized pops, coated with chocolate or sprinkles, making them perfect for quick desserts, parties, or satisfying your sweet tooth in no time. These simple, sweet treats bring pure joy without any oven time, ideal for candy lovers and cheesecake fans everywhere.
Why You’ll Love This Recipe
- Effortless preparation: No baking means a speedy, stress-free dessert perfect for busy days or last-minute gatherings.
- Deliciously creamy texture: Each pop melts in your mouth, combining smooth cheesecake with flavorful coatings.
- Customizable flavors: You can easily switch up coatings, mix-ins, and toppings to tailor them to any occasion or preference.
- Great for sharing: These pops are fun finger foods that everyone, from kids to adults, will enjoy at parties or family get-togethers.
- Minimal ingredients required: With just a few staples, you can whip up a batch without a pantry overhaul.
Ingredients You’ll Need
The magic of these No-Bake Cheesecake Pops lies in their simplicity. Each ingredient plays a key role, from the creamy base to the crunchy, colorful coatings, creating a well-balanced treat that’s as pleasing to the eye as it is to your taste buds.
- Cream cheese: Softened cream cheese provides the rich, creamy texture essential for cheesecake flavor.
- Granulated sugar: Sweetens the mixture just enough to enhance the cream cheese without overpowering it.
- Vanilla extract: Adds a warm, aromatic note that deepens the cheesecake taste beautifully.
- Graham cracker crumbs: Provide structure and that classic cheesecake crust flavor inside the pops.
- Whipped cream or heavy cream: Lightens the mixture for a fluffy, melt-in-your-mouth consistency.
- Chocolate or candy melts: For coating the pops, adding a smooth, sweet outer layer that hardens firmly.
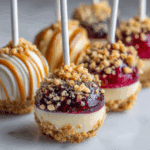
- Sprinkles or crushed nuts (optional): Adds visual appeal and textural contrast when used as a finishing touch.
- Lollipop sticks: Essential for creating those adorable, easy-to-hold cheesecake pops.
Variations for No-Bake Cheesecake Pops
One of the best things about No-Bake Cheesecake Pops is how effortlessly you can adapt them. Whether you have dietary restrictions or just want to switch things up, these variations will keep the recipes exciting and fresh.
- Fruit-infused pops: Fold in pureed strawberries, raspberries, or blueberries for a refreshing fruity twist.
- Chocolate lovers’ edition: Mix cocoa powder into the cheesecake base or use dark chocolate coatings for extra richness.
- Nutty delight: Add finely chopped almonds, pecans, or pistachios for a satisfying crunch inside or outside.
- Vegan-friendly version: Substitute cream cheese with cashew cream and use coconut cream for whipping to make it dairy-free.
- Spiced pops: Sprinkle in cinnamon, nutmeg, or pumpkin pie spice in the batter for cozy, seasonal flavors.

How to Make No-Bake Cheesecake Pops
Step 1: Prepare the Cheesecake Mixture
Start by beating softened cream cheese until smooth and creamy. Gradually add sugar and vanilla extract, continuing to mix until fully incorporated and silky. Gently fold in whipped cream or beaten heavy cream to lighten the batter. Finally, stir in graham cracker crumbs, ensuring a uniform texture that’s easy to shape.
Step 2: Form the Pops
With clean hands or a small cookie scoop, roll the cheesecake mixture into bite-sized balls. Aim for even sizing so they bake evenly or chill uniformly. Insert a lollipop stick into each ball, pressing gently to secure the stick without puncturing through the other side. Place all formed pops onto a parchment-lined baking sheet.
Step 3: Chill the Pops
Refrigerate the pops for at least 2 hours, allowing them to firm up properly. This chilling process is essential so the pops hold their shape during coating and enjoyment.
Step 4: Melt and Dip
Gently melt your chosen chocolate or candy melts in a microwave-safe bowl or double boiler, stirring often to prevent burning. Once smooth, dip each cheesecake pop fully into the melted chocolate, ensuring even coverage. Tap off any excess coating and transfer to wax paper or a silicone mat for drying.
Step 5: Decorate and Set
Before the coating hardens, sprinkle toppings like colorful sprinkles, crushed nuts, or shredded coconut over the pops to add flair. Allow the pops to set completely at room temperature or pop them back in the fridge for faster hardening.
Pro Tips for Making No-Bake Cheesecake Pops
- Use room temperature cream cheese: Softened cream cheese blends more smoothly, preventing lumps in your batter.
- Don’t skip chilling: Proper refrigeration helps the pops maintain their shape and makes dipping easier.
- Melt chocolate slowly: Use low heat to avoid burnt chocolate, ensuring a smooth coating.
- Work quickly when coating: Chocolate hardens fast, so dip and decorate your pops before the coating firms up.
- Try different dips: Experiment with white, milk, or dark chocolate coatings for variety in flavor and presentation.
How to Serve No-Bake Cheesecake Pops
Garnishes
Fresh fruit pieces, edible glitter, or crushed candies make fabulous garnishes that enhance both the look and flavor of your cheesecake pops. A sprinkle of sea salt on chocolate coatings also adds a gourmet finishing touch.
Side Dishes
Pair these sweet pops with a refreshing fruit salad, a light coffee, or even a tangy berry compote to balance the richness of the cheesecake. They’re also delightful alongside chilled sparkling beverages for festive occasions.
Creative Ways to Present
Arrange pops standing upright in a decorated styrofoam block or a themed container filled with colored sugar or candies. Wrap individual pops in clear cellophane tied with cute ribbons for gift-worthy presentation and party favors.
Make Ahead and Storage
Storing Leftovers
Keep leftover No-Bake Cheesecake Pops in an airtight container in the refrigerator for up to 5 days. This prevents drying out and keeps the texture fresh and creamy.
Freezing
You can freeze these pops on a baking sheet until firm, then transfer them to a freezer-safe bag or container for up to 3 months. Thaw overnight in the refrigerator before serving to maintain the best taste and texture.
Reheating
Since these are cold desserts, avoid reheating. Instead, allow any frozen pops to thaw gently in the fridge. Serve chilled for that perfect creamy bite.
FAQs
Can I use different types of cream cheese?
Yes! While full-fat cream cheese works best for texture and flavor, you can use reduced-fat versions, though the pops may be slightly less creamy.
Do I have to use lollipop sticks?
Not at all. You can simply roll cheesecake balls and serve them without sticks as bite-sized cheesecake truffles.
How long do No-Bake Cheesecake Pops last?
Stored properly in the refrigerator, they stay fresh for up to 5 days, making them ideal for preparing ahead of events.
Can I make these gluten-free?
Definitely! Use gluten-free graham cracker crumbs or substitute with crushed gluten-free cookies to keep the recipe safe for gluten-sensitive eaters.
What are the best coatings for these cheesecake pops?
Chocolate and candy melts work beautifully, but you can also try yogurt-based coatings or white chocolate mixed with flavors like lemon or matcha for unique tastes.
Final Thoughts
Whether it’s a family gathering, a casual treat, or a fun baking project, No-Bake Cheesecake Pops are the perfect solution. Their creamy texture, customizable flavors, and no-oven-needed preparation make them a true crowd-pleaser. Grab your ingredients and whip up this simple, sweet treat that’s bound to become your new favorite dessert!
Related Posts
- How to Make Fried Strawberry Cheesecake Sandwiches
- 5 Reasons Grilled Pineapple with Cinnamon Honey Glaze Wins
- Creamy Chocolate Avocado Mousse Recipe Delight
No-Bake Cheesecake Pops
No-Bake Cheesecake Pops are creamy, tangy cheesecake filling shaped into bite-sized pops, coated with chocolate or sprinkles. These simple and customizable treats are perfect for quick desserts, parties, or satisfying your sweet tooth without any oven time. Ideal for cheesecake lovers looking for an effortless and delicious dessert.
- Prep Time: 15 minutes
- Cook Time: 0 minutes
- Total Time: 2 hours 15 minutes
- Yield: 20 pops 1x
- Category: Dessert
- Method: No-Bake
- Cuisine: American
- Diet: Gluten Free
Ingredients
Main Ingredients
- 8 oz softened cream cheese
- 1/2 cup granulated sugar
- 1 teaspoon vanilla extract
- 1 cup graham cracker crumbs (or gluten-free cookies for gluten-free option)
- 1 cup whipped cream or heavy cream (whipped)
Coating and Decoration
- 1 cup chocolate or candy melts
- Sprinkles, crushed nuts, or shredded coconut (optional)
- Lollipop sticks
Instructions
- Prepare the Cheesecake Mixture: Beat softened cream cheese until smooth and creamy. Gradually add granulated sugar and vanilla extract, mixing until fully incorporated and silky. Gently fold in whipped cream or beaten heavy cream to lighten the batter. Finally, stir in graham cracker crumbs ensuring a uniform texture that’s easy to shape.
- Form the Pops: Using clean hands or a small cookie scoop, roll the cheesecake mixture into bite-sized balls of even size. Insert a lollipop stick into each ball, pressing gently to secure without puncturing through the other side. Place formed pops on a parchment-lined baking sheet.
- Chill the Pops: Refrigerate the pops for at least 2 hours to firm them up properly so they maintain shape during coating and serving.
- Melt and Dip: Gently melt your chosen chocolate or candy melts in a microwave-safe bowl or double boiler, stirring often to prevent burning. Once smooth, dip each cheesecake pop fully into the melted chocolate, ensuring even coverage. Tap off excess coating and place on wax paper or silicone mat to dry.
- Decorate and Set: Before the coating hardens, sprinkle toppings such as sprinkles, crushed nuts, or shredded coconut over the pops to add flair. Allow the pops to set completely at room temperature or in the refrigerator for faster hardening.
Notes
- Use room temperature cream cheese to ensure smooth blending and prevent lumps.
- Don’t skip chilling; it helps the pops hold shape and makes dipping easier.
- Melt chocolate slowly over low heat to avoid burning and ensure a smooth coating.
- Work quickly when coating as chocolate hardens fast.
- Try different coatings like white, milk, or dark chocolate for flavor variety.
Nutrition
- Serving Size: 1 pop
- Calories: 150
- Sugar: 10g
- Sodium: 90mg
- Fat: 11g
- Saturated Fat: 6g
- Unsaturated Fat: 4g
- Trans Fat: 0g
- Carbohydrates: 9g
- Fiber: 0.5g
- Protein: 2g
- Cholesterol: 35mg
Keywords: no-bake cheesecake pops, cheesecake bites, chocolate-coated cheesecake, easy dessert, party treats, gluten-free dessert