Why Homemade Cherry Pie Beats Store-Bought Every Time

There is something truly magical about a Homemade Cherry Pie that store-bought options just can’t match. The burst of tangy-sweet cherries, the buttery flaky crust, and the warm, inviting aroma coming fresh from your oven create an experience that’s worth every minute spent making it. Discover the unbeatable flavor and freshness of homemade cherry pie that makes store-bought versions pale in comparison every single time.
Why You’ll Love This Recipe
- Freshness like no other: Using fresh, ripe cherries brings an unmatched bright and juicy flavor that store-bought pies lack.
- Perfect flaky crust: Homemade dough gives you control over texture and butter content, resulting in a crust that melts in your mouth.
- Natural sweetness: Adjust sugar levels to your taste and avoid unnecessary preservatives found in commercial pies.
- Customizable filling: Add your favorite spices or mix-ins easily to make the pie your own.
- Heartwarming tradition: The process of making the pie is a joyful experience you can share with family and friends.
Ingredients You’ll Need
Creating your perfect homemade cherry pie starts with some simple yet essential ingredients. Each component contributes to the overall flavor, texture, and even the vibrant color that makes this pie so inviting.
- Fresh cherries: The star ingredient providing that signature tart-sweet balance and beautiful ruby color.
- Sugar: To enhance sweetness and create that luscious syrupy filling.
- All-purpose flour: Essential for thickening the cherry juices into a glossy, pie-perfect consistency.
- Butter: Adds richness and helps create a flaky, golden crust.
- Lemon juice: A little acidity brightens up the filling and balances the sweetness.
- Ground cinnamon or almond extract (optional): For an extra layer of warm, cozy flavor.
- Pie crust dough: Whether homemade or store-bought, a buttery crust is key for that satisfying crunch.
Variations for Homemade Cherry Pie
One of the joys of making your own homemade cherry pie is how easy it is to tailor the recipe to your personal tastes or dietary needs. Here are some creative ideas to inspire your next bake.
- Almond twist: Add sliced almonds or almond extract for a nutty undertone that pairs beautifully with cherries.
- Vegan version: Swap butter for coconut oil or vegan margarine and use a plant-based crust to fit vegan diets.
- Low-sugar option: Use natural sweeteners like honey or maple syrup, adjusting cherry sweetness accordingly.
- Mixed berry filling: Combine cherries with blueberries or raspberries for a delightful burst of flavor complexity.
- Gluten-free crust: Use gluten-free flour blends to make this pie safe for those with gluten sensitivities.

How to Make Homemade Cherry Pie
Step 1: Prepare your cherries
Begin by washing, pitting, and draining fresh cherries. This step ensures your filling will be juicy but not overly watery, which is crucial for the perfect pie texture.
Step 2: Mix the filling
In a large bowl, combine cherries with sugar, flour, lemon juice, and any optional spices or extracts. Stir gently to coat the cherries well without crushing them.
Step 3: Prepare the pie crust
Roll out your dough on a floured surface, placing the bottom crust in your pie pan. Trim edges to fit and chill if needed to keep the dough firm and easy to handle.
Step 4: Fill and top the pie
Pour the cherry filling into the crust, dot with small pieces of butter for extra richness, then cover with the top crust or a lattice pattern and seal the edges securely.
Step 5: Bake to golden perfection
Place your pie in a preheated oven and bake until the crust is a beautiful golden brown and the filling bubbles up enticingly through the vents or lattice.
Pro Tips for Making Homemade Cherry Pie
- Use fresh cherries whenever possible: They create a juicier, more flavorful filling than canned or frozen options.
- Chill the dough: Keeping the dough cold before baking helps create that signature flaky crust.
- Don’t skimp on thickening: Flour or cornstarch thickens the juices so your slice doesn’t run all over the plate.
- Vent the crust: Cut slits or create a lattice top to let steam escape and prevent sogginess.
- Brush crust with egg wash: This adds a gorgeous golden shine and a slight crispiness.
How to Serve Homemade Cherry Pie
Garnishes
Top your warm slice with a scoop of vanilla ice cream, a dollop of freshly whipped cream, or a sprinkle of powdered sugar to accentuate the flavors beautifully.
Side Dishes
Pair your pie with a smooth, creamy custard or a simple cup of black coffee or tea to create a balanced dessert experience without overwhelming the palate.
Creative Ways to Present
Serve individual mini pies or tartlets for parties, or create a layered cherry trifle using leftover pie pieces, fresh cream, and cake for a show-stopping dessert twist.
Make Ahead and Storage
Storing Leftovers
Wrap leftover pie tightly with plastic wrap or foil and keep it refrigerated; it should stay delicious for up to 3-4 days.
Freezing
To freeze, wrap the whole pie or individual slices securely and freeze for up to 2 months; thaw overnight in the fridge before reheating.
Reheating
Warm slices in the oven at 350°F (175°C) for about 10-15 minutes to refresh the crust and filling without drying it out.
FAQs
Can I use frozen cherries for homemade cherry pie?
Yes, frozen cherries can be used but make sure to thaw and drain them well to avoid excess moisture in the filling.
How do I prevent the pie crust from getting soggy?
Chilling the crust before baking, venting the top, and properly thickening the filling all help keep the crust crisp.
Is homemade cherry pie difficult to make?
Not at all! With simple ingredients and clear steps, even beginners can create a stunning homemade cherry pie.
Can I make the pie crust from scratch?
Absolutely, making crust from scratch adds freshness, but store-bought crusts can work well for convenience.
What’s the best way to pit cherries quickly?
Using a cherry pitter tool or pressing them with a metal straw through the center speeds up the process dramatically.
Final Thoughts
Making a homemade cherry pie is one of those kitchen adventures that fills your home with warmth and love. With fresh ingredients, simple steps, and plenty of room for personalization, this timeless dessert will quickly become a cherished favorite. So grab some cherries, roll up your sleeves, and enjoy a slice of joy that no store-bought pie can ever compete with!
Related Posts
- Why Strawberry Jello Poke Cake Is a Must-Try Dessert
- How to Make Italian Affogato at Home
- Irresistible Chocolate Strawberry Yogurt Clusters Recipe
Homemade Cherry Pie
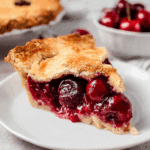
This homemade cherry pie offers a burst of tangy-sweet fresh cherries combined with a buttery, flaky crust and a warm, inviting aroma fresh from your oven. Made with simple, natural ingredients, this pie is customizable and delivers unbeatable flavor and freshness that store-bought options can’t match.
- Prep Time: 30 minutes
- Cook Time: 50 minutes
- Total Time: 1 hour 20 minutes
- Yield: 8 servings 1x
- Category: Dessert
- Method: Baking
- Cuisine: American
- Diet: Vegetarian
Ingredients
Filling Ingredients
- 4 cups fresh ripe cherries, washed, pitted, and drained
- 1 to 1½ cups sugar (adjust to taste)
- 3 tablespoons all-purpose flour (or cornstarch for thickening)
- 1 tablespoon fresh lemon juice
- Optional: 1/2 teaspoon ground cinnamon or 1 teaspoon almond extract
Crust and Topping Ingredients
- 9 inch pie crust dough (homemade or store-bought)
- 3 tablespoons unsalted butter, cut into small pieces
- 1 egg (for egg wash, optional)
Instructions
- Step 1: Prepare your cherries – Wash, pit, and thoroughly drain fresh cherries to ensure the filling remains juicy without becoming overly watery, which helps maintain the perfect pie texture.
- Step 2: Mix the filling – In a large bowl, gently combine the cherries with sugar, flour, lemon juice, and any optional spices or extracts, stirring carefully to coat the cherries evenly without crushing them.
- Step 3: Prepare the pie crust – Roll out your pie dough on a floured surface and place the bottom crust into a 9-inch pie pan. Trim the edges to fit, then chill if needed to keep the dough firm and easier to handle.
- Step 4: Fill and top the pie – Pour the cherry filling into the prepared crust, dot the surface with small pieces of butter for extra richness, then cover with the top crust or create a lattice pattern. Seal and crimp the edges securely.
- Step 5: Bake to golden perfection – Preheat the oven to 375°F (190°C). Place the pie on the middle rack and bake for approximately 45-55 minutes, until the crust is golden brown and the filling bubbles through the vents or lattice. If desired, brush the crust with egg wash before baking for a glossy finish.
Notes
- Use fresh cherries whenever possible for a juicier, more flavorful filling.
- Chill the dough before baking to achieve a flaky crust.
- Ensure proper thickening with flour or cornstarch so the filling is not runny.
- Vent the top crust with slits or lattice to let steam escape and prevent sogginess.
- Brush the crust with egg wash to add a golden shine and slight crispiness.
Nutrition
- Serving Size: 1 slice (1/8 of pie)
- Calories: 350
- Sugar: 25g
- Sodium: 150mg
- Fat: 15g
- Saturated Fat: 9g
- Unsaturated Fat: 5g
- Trans Fat: 0g
- Carbohydrates: 50g
- Fiber: 3g
- Protein: 3g
- Cholesterol: 35mg
Keywords: cherry pie, homemade cherry pie, berry pie, flaky crust, fresh cherries, fruit pie, dessert