How to Make Witch Hat Halloween Cookies Fast
If you’re looking for a quick and delightful treat to add some spooky charm to your Halloween celebrations, these Witch Hat Halloween Cookies are exactly what you need. This recipe brings together simple ingredients and creative decorating techniques to craft adorable, festive cookies that everyone—from kids to adults—will love. Whether you’re baking for a party, school event, or just to share with friends, these Witch Hat Halloween Cookies are fast to make, irresistibly tasty, and perfectly capture the Halloween spirit.
Why You’ll Love This Recipe
- Fast and Easy to Make: Minimal ingredients and quick steps make it perfect for last-minute Halloween baking.
- Kid-Friendly Fun: Decorating these hats is a delightful activity for the whole family to enjoy.
- Eye-Catching Design: The classic witch hat shape adds a festive and playful touch to your treat table.
- Delicious Flavor: Buttery cookies paired with rich chocolate create a mouthwatering combination.
- Customizable: You can easily adapt them with different flavors or colors to suit your preferences.
Ingredients You’ll Need
These Witch Hat Halloween Cookies rely on a handful of simple, easy-to-find ingredients that come together to create a perfectly balanced treat. Each component adds to the classic cookie texture or brings the fun festive vibe through color and decoration.
- Butter: Provides richness and a tender crumb to the cookie base.
- Sugar: Adds sweetness and helps create crisp edges.
- All-purpose flour: The main structure of the cookie dough.
- Cocoa powder: Gives the cookies a deep chocolate flavor and dark color perfect for witch hats.
- Egg: Binds all ingredients together and adds moisture.
- Vanilla extract: Enhances the overall flavor with a warm aroma.
- Chocolate kisses or candy melts: Used as the “top” of the hat and for adhering decorations.
- Orange or black icing: For decorating and adding that festive flair.
- Sprinkles or edible decorations: Optional accents to customize your witch hats.
Variations for Witch Hat Halloween Cookies
One of the best parts about this recipe is how easy it is to make your own. Whether you want to suit dietary needs or just spice things up, these Witch Hat Halloween Cookies can be transformed effortlessly to match your taste buds and holiday style.
- Gluten-free version: Substitute all-purpose flour with a gluten-free blend without sacrificing taste.
- Mint chocolate hats: Add a drop of peppermint extract and use mint-flavored chocolate kisses for an extra twist.
- Colorful bands: Use rainbow or neon icing instead of traditional orange and black for a playful look.
- Peanut butter cookies: Replace part of the butter with peanut butter for a nutty flavor.
- Vegan adaptation: Use plant-based butter and egg substitutes for a fully vegan treat.

How to Make Witch Hat Halloween Cookies
Step 1: Prepare the Dough
Start by creaming the butter and sugar together until smooth and fluffy. Add the egg and vanilla extract, mixing until combined. Gradually sift in the flour and cocoa powder, then mix just until you form a soft dough. Be careful not to overwork it to keep the cookies tender.
Step 2: Roll and Cut the Cookies
Chill the dough for about 30 minutes to make it easier to handle. Once chilled, roll it out on a lightly floured surface to about 1/4-inch thickness. Use a round cookie cutter (about 2 inches in diameter) to cut out circles—the base of your witch hats.
Step 3: Bake the Cookie Bases
Place the cookie circles on a lined baking sheet and bake at 350°F (175°C) for 8-10 minutes or until set but not browned. Let them cool completely before decorating to prevent melting or smudging the icing.
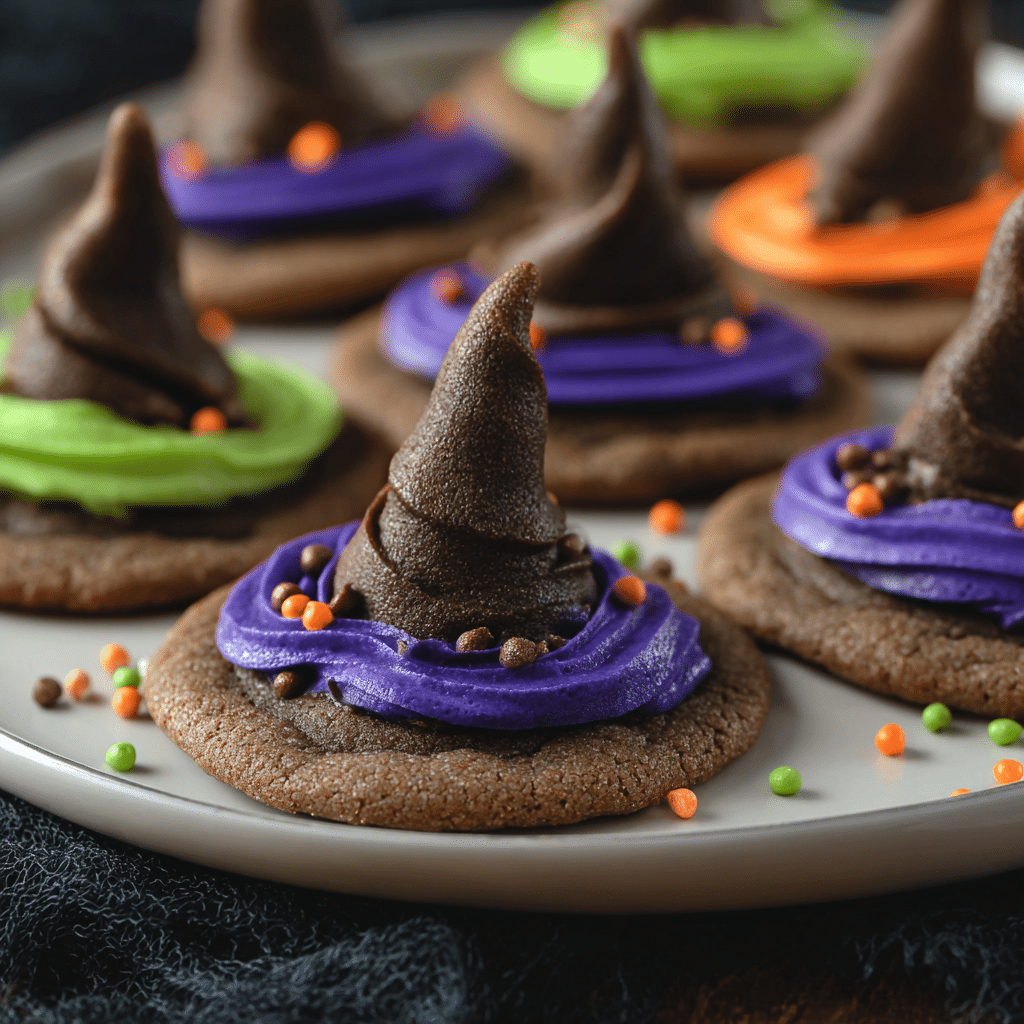
Step 4: Add the Hat Tops
Unwrap chocolate kisses or warm candy melts slightly to soften. Attach one centrally on top of each cookie base using a dab of melted chocolate or icing as glue. This creates the signature pointed top of the witch hat.
Step 5: Decorate the Witch Hats
Pipe icing around the base of the chocolate kiss to form the hat’s band. Use orange, black, or any festive colors. Add sprinkles or edible gems to customize your spooky hats. Let the decorations set fully before handling or packaging.
Pro Tips for Making Witch Hat Halloween Cookies
- Chill the dough: It’s essential to cool the dough for easier cutting and to prevent spreading during baking.
- Use parchment paper: Line your baking sheets to avoid sticking and ensure even baking.
- Apply gentle pressure: When attaching the chocolate tops, use just enough icing to hold them firmly without squeezing out excess.
- Customize icing consistency: Adjust your icing to be thick enough to hold shapes but soft enough to pipe smoothly.
- Work quickly with icing: Decorate before the base sets completely to achieve better adhesion.
How to Serve Witch Hat Halloween Cookies
Garnishes
Adding a little edible glitter or colored sugar on top of the icing band creates a magical sparkle, enhancing the witch hat theme beautifully and making the cookies even more eye-catching.
Side Dishes
Serve these cookies alongside warm apple cider or a spooky-themed punch to complement the flavors and keep everyone cozy during your Halloween festivities.
Creative Ways to Present
Display the Witch Hat Halloween Cookies on a tiered serving tray shaped like a cauldron or scattered among faux spider webs and miniature pumpkins for an immersive spooky presentation.
Make Ahead and Storage
Storing Leftovers
Keep your cookies fresh by storing them in an airtight container at room temperature for up to a week. Place parchment paper between layers to avoid sticking and preserve decoration integrity.
Freezing
You can freeze baked and decorated Witch Hat Halloween Cookies by individually wrapping them in plastic wrap and placing in a freezer-safe container. Thaw at room temperature before serving for best texture and flavor.
Reheating
Since these are cookies, reheating is not necessary. However, if you prefer warm cookies, gently warm them in a low-temperature oven (around 275°F or 135°C) for 5 minutes, avoiding the decorated tops to preserve their look.
FAQs
Can I use store-bought cookie dough for these cookies?
Yes! Store-bought chocolate cookie dough can save time, but freshness and homemade texture often yield better results for this recipe.
What if I don’t have chocolate kisses?
You can substitute candy melts or mini chocolate cones to replicate the witch hat top just as effectively.
How long do Witch Hat Halloween Cookies stay fresh?
Stored in an airtight container, they will stay fresh for about one week at room temperature.
Can I make these cookies gluten-free?
Absolutely! Use a gluten-free flour blend designed for baking to ensure tasty results.
What’s the best icing for decorating these cookies?
Royal icing or store-bought piping gel both work great for intricate decorations and holding candy pieces firmly.
Final Thoughts
These charming Witch Hat Halloween Cookies bring festive fun and delicious flavor to any Halloween gathering. Quick to prepare, easy to customize, and wonderfully tasty, they’re bound to become a seasonal favorite. So grab your ingredients, get baking, and enjoy the magic of these delightful holiday treats with your loved ones!
Related Posts
- Best Homemade Vanilla Ice Cream Recipe to Try
- Why Homemade Cherry Pie Beats Store-Bought Every Time
- Why Jammy Fruit Bars with Streusel Topping Delight
Witch Hat Halloween Cookies
Witch Hat Halloween Cookies are a quick, easy, and festive treat perfect for Halloween celebrations. These buttery chocolate cookies feature a classic witch hat design, topped with chocolate kisses and decorated with colorful icing and sprinkles. Ideal for baking with kids or customizing to your taste, these cookies capture the spooky fun and delicious flavor of the holiday.
- Prep Time: 15 minutes
- Cook Time: 8-10 minutes
- Total Time: 55 minutes
- Yield: About 24 cookies 1x
- Category: Appetizers
- Method: Baking
- Cuisine: American
- Diet: Gluten Free
Ingredients
Cookie Base
- 1/2 cup (115g) Butter, softened
- 1/2 cup (100g) Sugar
- 1 cup (125g) All-purpose flour (or gluten-free flour blend)
- 1/4 cup (25g) Cocoa powder
- 1 Large egg
- 1 teaspoon Vanilla extract
Decorations
- Chocolate kisses or candy melts (one per cookie)
- Orange or black icing (or preferred decorating colors)
- Sprinkles or edible decorations (optional)
Instructions
- Prepare the Dough: Cream the softened butter and sugar together until smooth and fluffy. Add the egg and vanilla extract, mixing until combined. Gradually sift in the flour and cocoa powder, mixing just until a soft dough forms. Avoid overworking to keep cookies tender.
- Roll and Cut the Cookies: Chill the dough for about 30 minutes to firm it up. On a lightly floured surface, roll the dough to about 1/4-inch thickness. Use a round cookie cutter about 2 inches in diameter to cut out circles which will serve as the base of the witch hats.
- Bake the Cookie Bases: Place cookie circles on a baking sheet lined with parchment paper. Bake at 350°F (175°C) for 8-10 minutes until set but not browned. Let cookies cool completely before decorating to avoid melting or smudging icing.
- Add the Hat Tops: Slightly soften chocolate kisses or candy melts if needed. Attach one chocolate kiss to the center of each cookie base using a dab of melted chocolate or icing as glue. This forms the pointed top of the witch hat.
- Decorate the Witch Hats: Pipe icing around the base of the chocolate kiss to create the hat’s band in orange, black, or any chosen color. Add sprinkles or edible gems to customize your hats. Allow the decorations to set fully before handling or packaging.
Notes
- Chill the dough before cutting to prevent spreading during baking.
- Use parchment paper on baking sheets for easy cleanup and even baking.
- Apply gentle pressure when attaching chocolate tops to avoid excess icing squeezing out.
- Adjust icing consistency to be thick enough to hold shapes but smooth for piping.
- Decorate cookies before they’ve fully set for better adhesion of decorations.
Nutrition
- Serving Size: 1 cookie
- Calories: 110
- Sugar: 8g
- Sodium: 40mg
- Fat: 6g
- Saturated Fat: 3.5g
- Unsaturated Fat: 2g
- Trans Fat: 0g
- Carbohydrates: 14g
- Fiber: 1g
- Protein: 1g
- Cholesterol: 20mg
Keywords: Halloween cookies, witch hat cookies, chocolate cookies, spooky treats, kid-friendly baking, festive cookies