Why Fried Cheese Bites Are Perfect Party Snacks
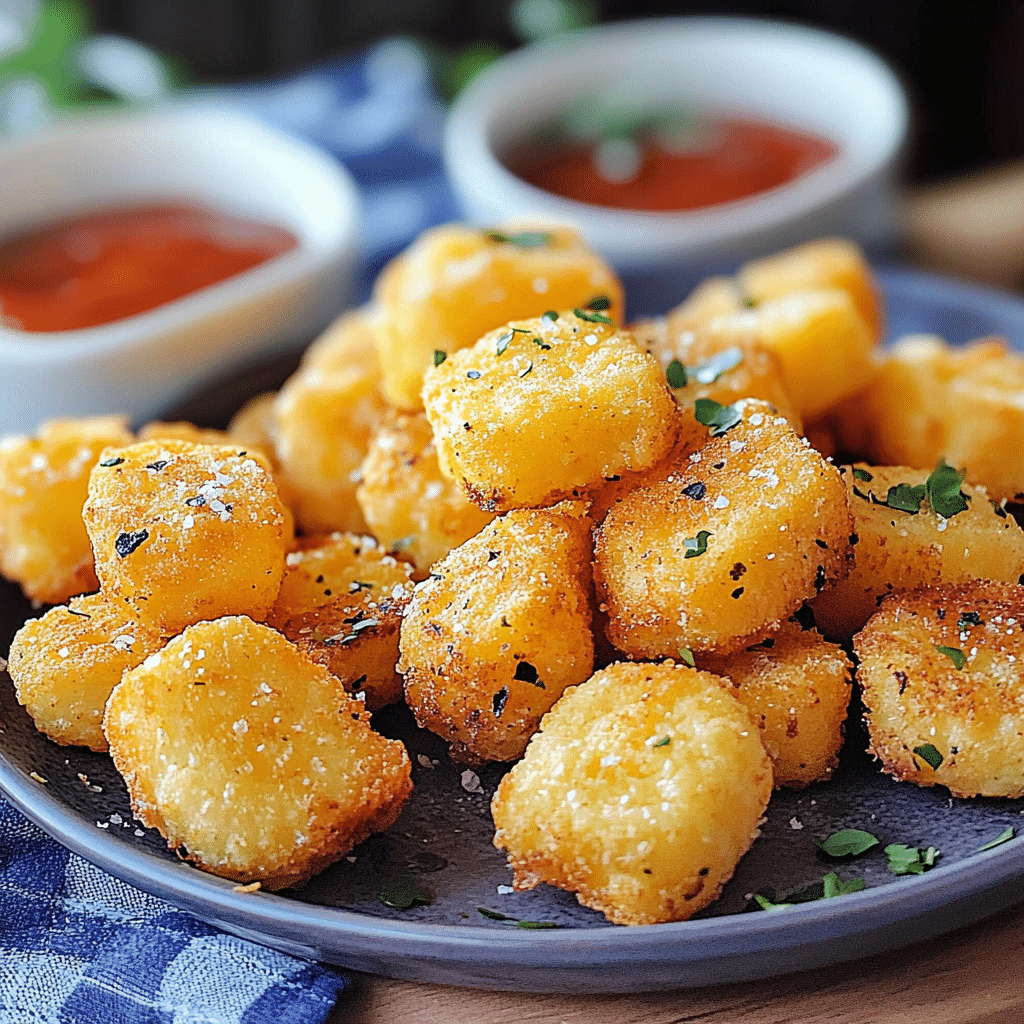
If you’re looking for the ultimate snack to wow your guests at any celebration, Fried Cheese Bites are your go-to answer. These crispy, golden morsels of cheesy goodness deliver that perfect balance of crunchy exterior and melty, savory center that everyone loves. Packed with rich flavor and satisfying texture, Fried Cheese Bites bring an irresistible crowd-pleasing vibe to parties, game nights, and casual gatherings alike. Whether served with dipping sauces or enjoyed plain, these tasty nibbles are guaranteed to disappear fast and keep everyone coming back for more.
Why You’ll Love This Recipe
- Crunchy Perfection: Each bite has a delightful crispy crust that contrasts brilliantly with the gooey cheese inside.
- Simple Ingredients: Made with easy-to-find pantry staples that come together quickly for fuss-free snacking.
- Customizable Flavor: You can tailor the cheese and seasonings to your taste, making every batch uniquely yours.
- Kid-Friendly Treat: Fried Cheese Bites are a hit with kids and adults alike, perfect for family gatherings.
- Party Ready: These bite-sized snacks are easy to make in large batches, ideal for entertaining a crowd.
Ingredients You’ll Need
The beauty of Fried Cheese Bites lies in their simplicity, yet each ingredient plays a crucial role — from the gooey cheese center to the crunchy breadcrumb coating that seals in flavor and texture.
- Cheese: Choose a firm yet melty cheese like mozzarella or cheddar for the perfect inside texture.
- Bread Crumbs: Use panko crumbs for an extra crunchy and golden coating.
- Flour: Helps the egg wash stick to the cheese pieces and forms a base for the breading.
- Eggs: Acts as the binding agent for the bread crumbs to coat the cheese evenly.
- Seasonings: Simple salt, pepper, and optional paprika or garlic powder enhance the overall flavor without overpowering.
- Oil for Frying: Neutral oils like vegetable or canola provide the right temperature and crispiness without added flavor.
Variations for Fried Cheese Bites
One of the best things about Fried Cheese Bites is how easy they are to customize so you can tweak them to fit your preferences, dietary needs, or what’s in your fridge.
- Cheese Blend: Mix mozzarella with sharp cheddar or pepper jack for a richer, spicier bite.
- Gluten-Free Option: Swap breadcrumbs for crushed gluten-free crackers or almond flour.
- Herb Infusion: Add finely chopped basil, parsley, or oregano to the breadcrumb mixture for fresh herb flavor.
- Spicy Kick: Toss in cayenne pepper or chili flakes to the seasoning for a little heat.
- Vegan Version: Use plant-based cheese alternatives and a flax egg to make the recipe vegan-friendly.

How to Make Fried Cheese Bites
Step 1: Prepare the Cheese Cubes
Cut your chosen cheese into bite-sized cubes, roughly 1-inch pieces, then chill them in the freezer for about 30 minutes to prevent melting too quickly during frying.
Step 2: Set Up the Breading Station
Arrange three shallow bowls: one with flour seasoned lightly with salt and pepper, one with beaten eggs, and one with seasoned panko breadcrumbs ready to coat the cheese cubes.
Step 3: Coat the Cheese
First, dredge each cheese cube in the flour, then dip it in the egg wash, and finally roll it in the breadcrumbs until fully coated. For extra crunch, repeat the egg and breadcrumb steps for a double coating.
Step 4: Fry Until Golden
Heat oil in a deep pan or fryer to 350°F (175°C). Fry the coated bites in small batches for 2-3 minutes until golden brown and crispy, turning occasionally for even cooking.
Step 5: Drain and Serve
Use a slotted spoon to remove the Fried Cheese Bites and place them on paper towels to drain excess oil before serving immediately for the best texture.
Pro Tips for Making Fried Cheese Bites
- Freeze Before Frying: Chilling or freezing the cheese cubes makes sure they hold their shape and don’t ooze out during frying.
- Oil Temperature: Maintaining the oil at 350°F ensures a crispy crust without absorbing too much oil.
- Don’t Overcrowd: Fry the bites in small batches to avoid lowering the oil temperature and sticking together.
- Double Coating: For extra crunch, repeat the egg wash and breadcrumb step before frying.
- Dry Thoroughly: Ensure each bite is fully coated and press down the breadcrumbs gently for a secure crust.
How to Serve Fried Cheese Bites
Garnishes
Sprinkle freshly chopped herbs like parsley or chives over the top for a pop of color and fresh flavor that complements the richness.
Side Dishes
Pair Fried Cheese Bites with tangy dipping sauces such as marinara, ranch dressing, or spicy aioli to add dimension; side salads or veggie sticks balance the indulgence.
Creative Ways to Present
Serve these cheese bites on a decorative platter with toothpicks for easy snacking, or fill mini baskets lined with parchment paper for a charming presentation that guests will love.
Make Ahead and Storage
Storing Leftovers
Place any leftover Fried Cheese Bites in an airtight container and refrigerate for up to 2 days, though they are best enjoyed fresh for optimal crispiness.
Freezing
Freeze the breaded, uncooked cheese bites on a baking sheet, then transfer to a freezer bag for up to 1 month—fry them directly from frozen for convenience.
Reheating
Reheat in a hot oven or air fryer at 375°F for 5-7 minutes to regain that crunchy exterior, avoiding the microwave which can make them soggy.
FAQs
Can I use any type of cheese for Fried Cheese Bites?
Yes, but cheeses that melt well like mozzarella, cheddar, or Monterey Jack work best because they create a gooey center without becoming too runny.
Are Fried Cheese Bites gluten-free?
Traditional recipes use breadcrumbs containing gluten, but you can make them gluten-free by substituting with gluten-free breadcrumbs or crushed nuts.
How can I make Fried Cheese Bites less greasy?
Make sure the oil is at the correct temperature and drain the bites on paper towels right after frying to reduce excess oil absorption.
Can I bake Fried Cheese Bites instead of frying?
Yes, you can bake them in a preheated oven at 400°F for about 10-15 minutes, turning halfway for even crisping, though frying gives a crunchier texture.
What dipping sauces pair well with Fried Cheese Bites?
Classic options like marinara sauce, garlic aioli, ranch dressing, or spicy mustard complement the cheesy bites beautifully and add flavor variety.
Final Thoughts
Give Fried Cheese Bites a try for your next gathering and watch how quickly they become the star of your snack table. Their crispy coating and melty cheese center are simply unbeatable, making them a joyful treat you’ll want to make again and again. Whether for a casual hangout or a festive party, these delicious bites bring warmth, comfort, and lots of smiles to the table.
PrintFried Cheese Bites
Fried Cheese Bites are crispy, golden, bite-sized snacks with a crunchy exterior and a gooey, melty cheese center. Perfect for parties, game nights, and casual gatherings, these easy-to-make appetizers use simple pantry ingredients and can be customized with various cheeses and seasonings. Serve them with your favorite dipping sauces or enjoy them plain for an irresistible crowd-pleasing treat.
- Prep Time: 40 minutes
- Cook Time: 10 minutes
- Total Time: 50 minutes
- Yield: 4 servings (about 24 bites) 1x
- Category: Appetizers
- Method: Frying
- Cuisine: American
- Diet: Gluten Free (if using gluten-free breadcrumbs and flour)
Ingredients
Cheese
- 8 oz mozzarella or cheddar cheese, cut into 1-inch cubes
Breading
- 1 cup panko bread crumbs (or gluten-free breadcrumbs for a gluten-free option)
- 1/2 cup all-purpose flour (or gluten-free flour alternative)
- 2 large eggs, beaten
Seasonings
- 1/2 teaspoon salt
- 1/4 teaspoon black pepper
- Optional: 1/4 teaspoon paprika or garlic powder
Frying
- Vegetable or canola oil, for frying (enough for a 2-inch deep fryer or pan)
Instructions
- Prepare the Cheese Cubes: Cut your chosen cheese into 1-inch bite-sized cubes. Place the cubes on a baking sheet and freeze for about 30 minutes to prevent excessive melting during frying.
- Set Up the Breading Station: Arrange three shallow bowls: one with seasoned flour (salt and pepper mixed in), one with beaten eggs, and one with seasoned panko breadcrumbs ready for coating.
- Coat the Cheese: Dredge each chilled cheese cube first in the flour, then dip it into the beaten eggs, and finally roll it in the breadcrumbs until fully coated. For extra crunch, repeat the egg wash and breadcrumb step for a double coating.
- Heat the Oil: Preheat oil in a deep pan or fryer to 350°F (175°C), ensuring the oil is hot enough for frying but not smoking.
- Fry Until Golden: Fry the coated cheese bites in small batches for 2-3 minutes, turning occasionally for even golden and crispy crusts. Avoid overcrowding the pan.
- Drain and Serve: Use a slotted spoon to remove the bites, and place them on paper towels to drain excess oil. Serve immediately for optimal crunch and melty cheese inside.
Notes
- Freeze the cheese cubes before frying to prevent the cheese from melting too quickly and leaking out.
- Maintain the oil temperature at 350°F to ensure crispy bites without excessive oil absorption.
- Fry in small batches to avoid overcrowding, which lowers oil temperature and causes soggy bites.
- Double coating with egg and breadcrumbs yields an extra crunchy texture.
- Press breadcrumbs gently onto the cheese to secure a firm crust.
Nutrition
- Serving Size: 6 bites
- Calories: 220 kcal
- Sugar: 1 g
- Sodium: 350 mg
- Fat: 16 g
- Saturated Fat: 8 g
- Unsaturated Fat: 6 g
- Trans Fat: 0 g
- Carbohydrates: 10 g
- Fiber: 1 g
- Protein: 10 g
- Cholesterol: 75 mg
Keywords: fried cheese bites, crispy cheese snacks, appetizer, party snacks, cheesy bites, gluten-free cheese bites, kid-friendly snacks