Irresistible Peanut Butter Blossom Bars Recipe

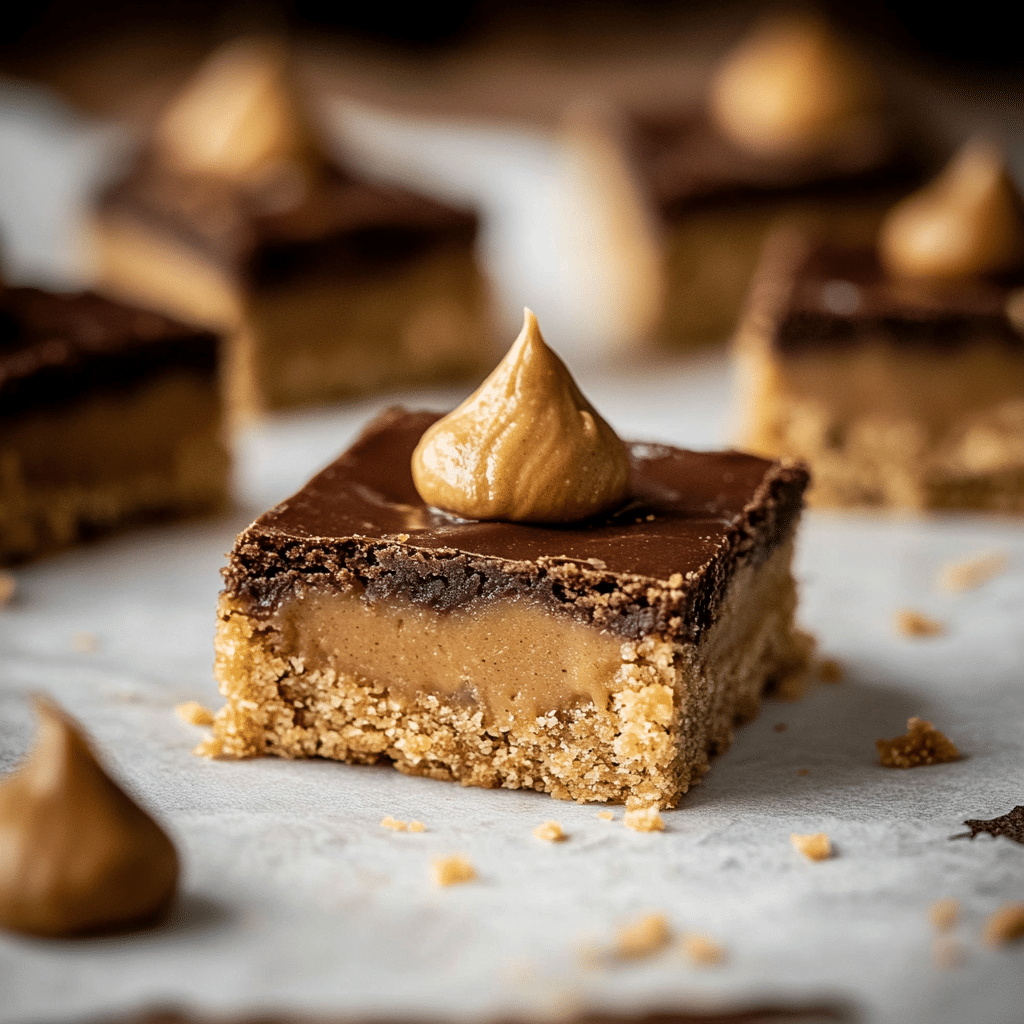
The Peanut Butter Blossom Bars recipe is a deliciously chewy and sweet treat that combines rich peanut butter flavor with classic chocolate kiss centers, creating a perfect balance of textures and tastes. Whether you’re baking for a special occasion, holiday gathering, or simply craving an irresistible homemade dessert, these bars are easy to make and guaranteed to please every peanut butter lover.
Why You’ll Love This Recipe
- Simple Ingredients: Made with pantry staples that come together effortlessly for a satisfying snack.
- Chewy and Soft Texture: Soft yet chewy bars that melt in your mouth with every bite.
- Perfect Sweet-Salty Balance: The peanut butter and chocolate pairing is classic and utterly addictive.
- Great for Any Occasion: Whether it’s a casual snack or party dessert, these bars fit right in.
- Easy to Customize: You can tweak flavors or toppings to fit your personal preferences or dietary needs.
Ingredients You’ll Need
Each ingredient plays a vital role in creating the perfect Peanut Butter Blossom Bars, contributing to their rich flavor, appealing texture, and inviting color. Using basic but quality ingredients ensures every bite delivers satisfaction.
- Peanut Butter: Choose creamy or crunchy based on your texture preference for authentic flavor.
- Granulated Sugar: Adds sweetness and helps develop a slight crisp edge on the bars.
- Brown Sugar: Brings moisture and a deeper caramel note to the chewiness.
- All-Purpose Flour: The base that holds the bars together with just enough density.
- Baking Soda: Helps the bars rise slightly and keep the texture light but chewy.
- Salt: Enhances the peanut butter flavor and balances sweetness.
- Egg: Binds the ingredients and adds richness.
- Vanilla Extract: Adds warmth and rounds out the flavors.
- Chocolate Kisses: The classic centerpiece that melts into the bars once baked.
Variations for Peanut Butter Blossom Bars
This recipe is incredibly versatile, allowing you to switch things up with ease. Whether you need to accommodate dietary needs or just want to add a fun twist, these variations make customization a breeze.
- Nut-Free Option: Substitute peanut butter with sunflower seed butter for allergy-friendly bars.
- Chocolate Swirl: Melt some chocolate chips and drizzle on top for extra chocolate goodness.
- Healthy Twist: Replace half the flour with oat flour for a slightly nuttier flavor and added fiber.
- Spiced Version: Add a pinch of cinnamon or chili powder to the batter for a warming kick.
- Chunky Texture: Fold in chopped peanuts or peanut butter chips for extra crunch.

How to Make Peanut Butter Blossom Bars
Step 1: Prepare the Oven and Pan
Preheat your oven to 350°F (175°C) and line a 9×13 inch baking pan with parchment paper or grease it lightly to prevent sticking.
Step 2: Mix Wet Ingredients
In a large bowl, beat the peanut butter, granulated sugar, and brown sugar together until creamy. Add the egg and vanilla extract, mixing until fully combined and smooth.
Step 3: Combine Dry Ingredients
In a separate bowl, whisk the all-purpose flour, baking soda, and salt. Gradually add the dry ingredients to the wet ingredients and mix just until combined, forming a thick dough.
Step 4: Press Dough Into Pan
Spread the dough evenly into the prepared baking pan, using a spatula or your hands to smooth it out for an even layer.
Step 5: Add Chocolate Kisses
Place chocolate kisses spaced evenly across the top of the dough, gently pressing each one into the batter without pushing it all the way through.
Step 6: Bake and Cool
Bake the bars in the preheated oven for 18 to 22 minutes or until the edges are lightly golden and the center looks set. Allow to cool completely before cutting into squares to ensure clean slices.
Pro Tips for Making Peanut Butter Blossom Bars
- Use Room Temperature Ingredients: This ensures the dough mixes evenly without lumps.
- Don’t Overmix: Mixing until just combined keeps bars tender and prevents toughness.
- Even Spacing of Chocolate Kisses: Distribute them evenly for uniform bites and visual appeal.
- Cooling is Key: Let the bars cool fully to avoid crumbly or sticky slices.
- Try Different Peanut Butters: Natural or flavored peanut butters bring unique twists to the flavor.
How to Serve Peanut Butter Blossom Bars
Garnishes
Sprinkle a pinch of flaky sea salt on top for a sweet and salty contrast, or dust with powdered sugar for a festive look.
Side Dishes
Serve alongside a cold glass of milk or a cup of hot coffee or tea to balance the rich peanut butter and chocolate flavors.
Creative Ways to Present
Cut bars into bite-sized squares for party platters, or layer them between wax paper and wrap individually for grab-and-go treats.
Make Ahead and Storage
Storing Leftovers
Keep leftover bars in an airtight container at room temperature for up to five days to maintain freshness and chewy texture.
Freezing
Wrap bars tightly in plastic wrap and place in a freezer-safe container or bag; freeze for up to three months. Thaw at room temperature before serving.
Reheating
Warm bars slightly in the microwave for 10-15 seconds to soften the chocolate and enhance the peanut butter aroma, perfect for a cozy treat.
FAQs
Can I use natural peanut butter in this recipe?
Yes, natural peanut butter works well, but the consistency might slightly change the dough texture, so you may need to chill it before baking.
Are Peanut Butter Blossom Bars gluten-free?
Not as written, but you can substitute all-purpose flour with a gluten-free blend to make a gluten-free version.
Can I make these bars vegan?
To make vegan Peanut Butter Blossom Bars, use a flax egg or another egg substitute and choose vegan chocolate kisses.
How thick should I spread the dough in the pan?
Spread the dough evenly about 1/2 inch thick to ensure the bars bake uniformly and achieve the right chewy texture.
Can I double this recipe?
Absolutely! Just double all ingredients and use a larger pan or two pans for baking, adjusting the baking time slightly as needed.
Final Thoughts
There’s something truly comforting about homemade Peanut Butter Blossom Bars, with their chewy texture and classic peanut butter and chocolate combo. Whether you enjoy them as an everyday snack or a special dessert, they’re a reliable crowd-pleaser that’s simple to make and impossible to resist. Give this recipe a try—it might just become your new favorite sweet treat!
PrintPeanut Butter Blossom Bars
Peanut Butter Blossom Bars are chewy and soft bars that combine rich peanut butter flavor with classic chocolate kiss centers, delivering a perfect sweet and salty balance. They are easy to make with pantry staples, great for any occasion, and customizable to suit personal tastes or dietary needs.
- Prep Time: 15 minutes
- Cook Time: 20 minutes
- Total Time: 35 minutes
- Yield: 24 bars 1x
- Category: Dessert
- Method: Baking
- Cuisine: American
- Diet: Can be made gluten-free with substitutions; vegan options available
Ingredients
Main Ingredients
- 1 cup creamy or crunchy peanut butter
- 1/2 cup granulated sugar
- 1/2 cup brown sugar, packed
- 1 large egg
- 1 teaspoon vanilla extract
- 1 1/4 cups all-purpose flour
- 1/2 teaspoon baking soda
- 1/4 teaspoon salt
- 24 chocolate kisses (about 12 ounces)
Instructions
- Prepare the Oven and Pan: Preheat your oven to 350°F (175°C) and line a 9×13 inch baking pan with parchment paper or lightly grease it to prevent sticking.
- Mix Wet Ingredients: In a large bowl, beat the peanut butter, granulated sugar, and brown sugar together until creamy. Add the egg and vanilla extract, mixing until fully combined and smooth.
- Combine Dry Ingredients: In a separate bowl, whisk the all-purpose flour, baking soda, and salt. Gradually add the dry ingredients to the wet ingredients and mix just until combined to form a thick dough.
- Press Dough Into Pan: Spread the dough evenly into the prepared baking pan using a spatula or your hands, smoothing it out to an even layer about 1/2 inch thick.
- Add Chocolate Kisses: Place chocolate kisses evenly spaced across the top of the dough, gently pressing each one into the batter without pushing it all the way through.
- Bake and Cool: Bake for 18 to 22 minutes or until edges are lightly golden and the center looks set. Allow the bars to cool completely before cutting into squares for clean slices.
Notes
- Use room temperature ingredients for even mixing without lumps.
- Do not overmix the dough to keep bars tender and avoid toughness.
- Distribute chocolate kisses evenly for uniform bites and attractive presentation.
- Allow bars to cool fully before cutting to prevent crumbly or sticky slices.
- Experiment with different types of peanut butter for unique flavor variations.
Nutrition
- Serving Size: 1 bar
- Calories: 190
- Sugar: 15g
- Sodium: 140mg
- Fat: 11g
- Saturated Fat: 4g
- Unsaturated Fat: 6g
- Trans Fat: 0g
- Carbohydrates: 18g
- Fiber: 2g
- Protein: 5g
- Cholesterol: 25mg
Keywords: peanut butter, peanut butter bars, chocolate kiss bars, chewy bars, dessert, snack, holiday treat, homemade dessert


