How to Make Wicked Witch Fudge Easily
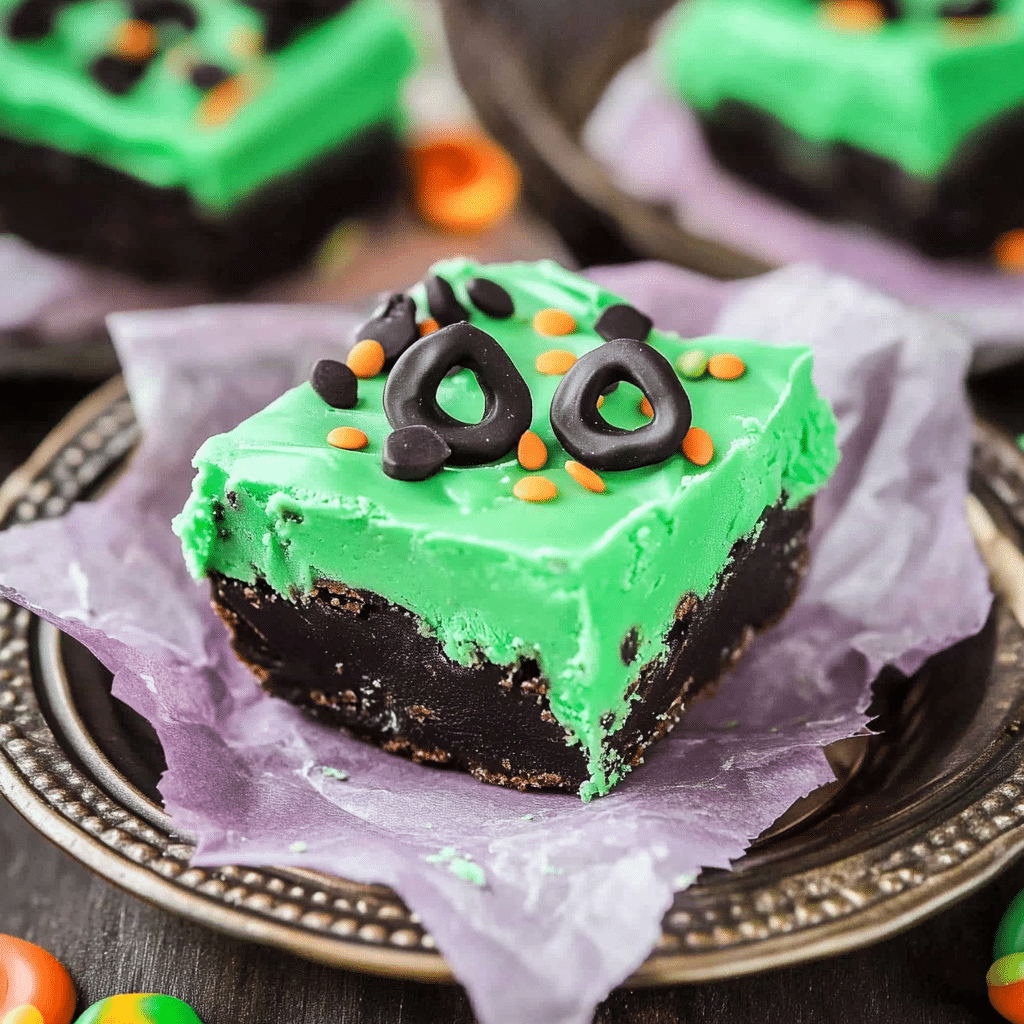
If you’re ready to treat yourself to something truly magical and decadently delightful, look no further than Wicked Witch Fudge. This rich, creamy, and irresistibly sweet fudge is perfect for Halloween celebrations, cozy nights, or any time you crave a luscious chocolate escape. With a simple, step-by-step guide, you’ll master this enchanting treat in no time, unlocking the perfect balance of smooth texture and wickedly tasty flavor.
Why You’ll Love This Recipe
- Effortless Preparation: This recipe uses easy-to-find ingredients and clear steps, making it perfect for beginners and experts alike.
- Rich Flavor Profile: A balance of deep chocolate, creamy sweetness, and subtle hints of vanilla create an unforgettable taste.
- Perfect Texture: Smooth, melt-in-your-mouth fudge that’s neither too firm nor too soft, ideal for gifting or snacking.
- Festive Appeal: Its spooky theme makes it a fun and fitting treat for Halloween or any magical gathering.
- Customizable Ingredients: Easily adapt it to dietary preferences without losing the trademark deliciousness.
Ingredients You’ll Need
To create your Wicked Witch Fudge, we focus on a handful of essential ingredients that ensure rich flavor, creamy consistency, and that classic fudge color. Each component plays a special role in transforming simple ingredients into a pot of pure indulgence.
- Semisweet Chocolate Chips: The main ingredient providing rich cocoa flavor and smoothness.
- Sweetened Condensed Milk: Adds sweetness and gives fudge its creamy, velvety texture.
- Unsalted Butter: For enhancing the richness and helping create that melt-in-your-mouth softness.
- Vanilla Extract: A splash of vanilla enhances depth and balances the sweetness.
- Optional Food Coloring: Use green or purple to match the Wicked Witch theme for a fun twist.
- Festive Toppings: Crushed candy, edible glitter, or Halloween sprinkles to jazz up the presentation.
Variations for Wicked Witch Fudge
One of the best parts of making Wicked Witch Fudge is how easy it is to customize. Whether you want to cater to dietary needs or add your unique touch, here are some wickedly fun variations to try out.
- Nutty Surprise: Add chopped pecans or walnuts for crunch and an earthy contrast.
- Dairy-Free Delight: Substitute with coconut milk and dairy-free chocolate to keep it vegan-friendly.
- Spicy Kick: Incorporate a pinch of cayenne pepper or cinnamon to add warmth and depth.
- Mint Madness: Mix in peppermint extract and green food coloring for a refreshing spin.
- Salted Caramel Twist: Drizzle caramel sauce over the fudge and sprinkle with sea salt for a sweet-salty combo.

How to Make Wicked Witch Fudge
Step 1: Prepare Your Pan
Line an 8×8-inch baking pan with parchment paper or lightly grease it to ensure your fudge releases effortlessly once set.
Step 2: Melt the Butter and Chocolate
In a medium saucepan over low heat, combine the butter and chocolate chips. Stir continuously until melted and smooth to avoid burning.
Step 3: Add Sweetened Condensed Milk and Vanilla
Remove the pan from heat, then stir in the sweetened condensed milk and vanilla extract until everything is well combined and shiny.
Step 4: Add Color and Mix Coloring Evenly
If you want to add that wicked green or spooky purple, now’s the time to mix in your food coloring until you achieve the ideal shade.
Step 5: Pour and Add Toppings
Pour the fudge mixture into your prepared pan, smooth the surface, then sprinkle your desired festive toppings evenly over the top.
Step 6: Chill Until Set
Place the pan in the refrigerator for at least 2 hours or until the fudge is firm but still pliable.
Step 7: Slice and Serve
Once chilled, remove from the pan using the parchment paper edges and cut into bite-sized squares. Enjoy your wickedly delicious creation!
Pro Tips for Making Wicked Witch Fudge
- Use Quality Chocolate: Higher-quality chocolate makes a noticeable difference in flavor and texture.
- Stir Constantly: Prevent scorching by stirring the chocolate and butter gently but continuously as they melt.
- Don’t Skip Cooling Time: Proper chilling ensures perfect texture; patience pays off.
- Temperature Matters: Keep heat low and avoid boiling to maintain creaminess.
- Clean Utensils: Use dry, clean bowls and utensils to prevent seizing or clumping.
How to Serve Wicked Witch Fudge
Garnishes
Add spooky sprinkles, edible glitter, or crushed candy on top to enhance the festive look and texture of your Wicked Witch Fudge.
Side Dishes
Pair your fudge bites with classic Halloween treats like caramel apples or hot mulled cider for a complete magical experience.
Creative Ways to Present
Wrap pieces in colored wax paper or place them in themed Halloween tins for gifting. Display on a decorated platter alongside dark chocolate and candy corn for an irresistible candy buffet.
Make Ahead and Storage
Storing Leftovers
Keep leftover Wicked Witch Fudge in an airtight container at room temperature or refrigerated to maintain freshness and texture for up to two weeks.
Freezing
For longer storage, wrap fudge squares tightly in plastic wrap and place them in a freezer-safe container; freeze for up to three months.
Reheating
Allow frozen fudge to thaw at room temperature before serving. Avoid microwaving to maintain the smooth and creamy texture.
FAQs
Can I substitute dark chocolate for semisweet chocolate?
Absolutely! Dark chocolate will make your Wicked Witch Fudge richer and slightly less sweet but just as delicious.
Is it necessary to use sweetened condensed milk?
Yes, it’s key to achieving the creamy texture and sweetness that define classic fudge, though some dairy-free versions use coconut milk alternatives.
How long does Wicked Witch Fudge keep fresh?
Stored properly in an airtight container, it stays fresh for up to two weeks at room temperature or refrigerated.
Can I add nuts or other mix-ins?
Definitely! Chopped nuts, candy pieces, or dried fruits can be mixed in before setting to customize your fudge.
What’s the best way to cut fudge without crumbling?
Use a sharp knife warmed with hot water and wiped dry between cuts to create clean, smooth slices.
Final Thoughts
Making Wicked Witch Fudge is like brewing a batch of pure happiness. With simple ingredients and a few easy steps, you’ll have a batch of rich, delightful fudge that’s sure to wow your friends and satisfy your sweet tooth. Ready to bring a little magic to your kitchen? Dive into this recipe and let the wickedly delicious fun begin!
Related Posts
- Quick Almond Croissant Bites Bliss You’ll Love
- How to Make Perfect Tiramisu Brownies Today
- Why Matcha Mochi Cookies Are Irresistible Treats
Wicked Witch Fudge
Wicked Witch Fudge is a rich, creamy, and indulgently sweet chocolate treat perfect for Halloween or any time you desire a luscious chocolate escape. With easy-to-follow steps and simple ingredients, this fudge offers a perfect balance of smooth texture and deep chocolate flavor, customizable for various dietary preferences and decorated with festive toppings for a spooky twist.
- Prep Time: 10 minutes
- Cook Time: 10 minutes
- Total Time: 2 hours 20 minutes
- Yield: 36 pieces (about 1-inch squares) 1x
- Category: Desserts
- Method: Stovetop melting and chilling
- Cuisine: American
- Diet: Gluten Free
Ingredients
Base Ingredients
- 2 cups semisweet chocolate chips
- 1 (14 oz) can sweetened condensed milk
- 1/4 cup unsalted butter
- 1 teaspoon vanilla extract
Optional Ingredients
- Green or purple food coloring (to match Wicked Witch theme)
- Festive toppings: crushed candy, edible glitter, or Halloween sprinkles
Variations (Optional)
- Chopped pecans or walnuts (for Nutty Surprise)
- Coconut milk and dairy-free chocolate (for Dairy-Free Delight)
- Pinch of cayenne pepper or cinnamon (for Spicy Kick)
- Peppermint extract and green food coloring (for Mint Madness)
- Caramel sauce and sea salt (for Salted Caramel Twist)
Instructions
- Prepare Your Pan: Line an 8×8-inch baking pan with parchment paper or lightly grease it to ensure your fudge releases effortlessly once set.
- Melt the Butter and Chocolate: In a medium saucepan over low heat, combine the butter and chocolate chips. Stir continuously until melted and smooth to avoid burning.
- Add Sweetened Condensed Milk and Vanilla: Remove the pan from heat, then stir in the sweetened condensed milk and vanilla extract until everything is well combined and shiny.
- Add Color and Mix Coloring Evenly: If you want to add that wicked green or spooky purple, now’s the time to mix in your food coloring until you achieve the ideal shade.
- Pour and Add Toppings: Pour the fudge mixture into your prepared pan, smooth the surface, then sprinkle your desired festive toppings evenly over the top.
- Chill Until Set: Place the pan in the refrigerator for at least 2 hours or until the fudge is firm but still pliable.
- Slice and Serve: Once chilled, remove from the pan using the parchment paper edges and cut into bite-sized squares. Enjoy your wickedly delicious creation!
Notes
- Use high-quality chocolate for better flavor and texture.
- Stir constantly while melting butter and chocolate to prevent scorching.
- Do not skip the chilling time for perfect fudge texture.
- Keep heat low and avoid boiling to maintain creaminess.
- Use dry, clean bowls and utensils to avoid seizing or clumping of chocolate.
- To cut fudge cleanly, use a sharp knife warmed with hot water and wiped dry between cuts.
- Customize with nuts, spices, or extracts as desired before setting.
Nutrition
- Serving Size: 1 piece (1-inch square)
- Calories: 110
- Sugar: 18g
- Sodium: 35mg
- Fat: 5g
- Saturated Fat: 3g
- Unsaturated Fat: 2g
- Trans Fat: 0g
- Carbohydrates: 18g
- Fiber: 1g
- Protein: 1g
- Cholesterol: 10mg
Keywords: fudge, chocolate fudge, Halloween treat, Wicked Witch fudge, easy fudge recipe, creamy fudge, festive dessert, holiday sweets

